GST registration process online in India based and should do on the government website gst.gov.in.
In addition, To register as a normal taxable person, the process of GST registration is mandatory for those traders whose turnover is more than ₹ 40 lakhs. This process called GST registration.
However, For North Eastern and hill states, the mandatory turnover limit for businessmen is ₹10 lakh. The process of GST registration usually takes 2-6 working days.
Busy in finalizing the rules and regulations with the GST Bill approved by the President and the GST Council. All existing businesses registered under Central Excise. Service Tax or VAT needs to register under GST using the online registration process.
Steps to fill up Part-A of GST Registration Application
- Go to the GST Portal. Click on Services. Then, click on the ‘Registration’ tab and after that, select ‘New Registration’.
- Enter the following details in Part A
- Select the New Registration radio button
- In the drop-down under ‘I am a’ – select Taxpayer
- Select State and District from the drop-down
- Enter the Name of Business and PAN of the business
- Key in the Email Address and Mobile Number. The registered email id and mobile number will receive the OTPs.
- Click on Proceed
- Enter two OTP received on email and mobile. Click Continue. If you have not received OTP then click on Resend OTP.
- After that, You will now receive a 15-digit Temporary Reference Number (TRN). It will also be sent to your email and mobile. Note down the TRN. You have to fill in the Part-B details within the next 15 days.
- After that, once again go to the GST Portal. Select the ‘New Registration’ tab.
- Select the Temporary Reference Number (TRN). Enter TRN and Captcha code and click on Proceed.
- You will receive an OTP on the registered mobile and email. Enter OTP and click on Proceed
- After that, You will see that the application status shown as a draft. Click on the Edit icon.
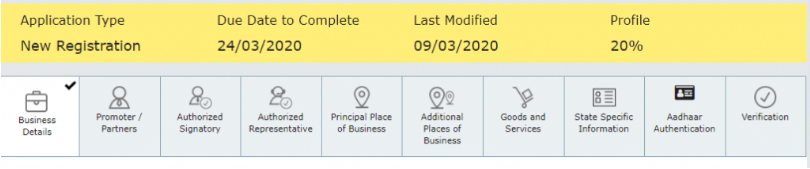
Steps to fill Part-B of GST registration application
However, Part B has 10 sections. Fill in all the details and submit the proper documents. Aadhaar authentication section added and the bank account section made non-mandatory in 2020.
Here is the list of documents that you need to keep with you while applying for GST registration :
- Photographs
- Constitution of the taxpayer
- Proof for the place of business
- Bank account details*
- Verification and aadhaar authentication, if chosen
However, Bank account details are not mandatory at the time of GST registration from 27th December 2018.
- Under the Business Details section, enter the Business Name, Occupation Constitution, and District.
- Note: Trade name is completely different from the legal name of the business.
- Moving on, select ‘Yes/No’ to opt-in or out of the composition scheme, against the field – “Options for Composition“. In addition, select the type of person registered as a manufacturer or service provider of a works contract or any other person eligible for the composition scheme.
- After that, enter the date of commencement of business and the date from which the liability arises. Further, select ‘Yes/No’ for the type of registration as a Casual Taxable Person, and if ‘Yes’ selected, enter the details for payment of Advance Tax as per GST Law for Casual Taxable Persons Generate invoice by doing
- In addition, under ‘Reason for obtaining registration’, select the reason as ‘Input Service Distributor’, if so, at this stage. Alternatively, there are many other options available to choose from.
- Based on the selection made, enter the details in the fields that appear. For example, if you select ‘SEZ Unit’, enter the name of the SEZ, designation of the Approving Authority, Approval Order Number, etc., and upload the supporting documents.
- In the Indicate Existing Registration section, select the type of existing registration such as Central Sales Tax, Excise or Service Tax, registration number, and date of registration. Next, click on the ‘Add’ button.
In addition, Once the details entered, you see that the tile turns blue indicating the completion of filling the details in that section.
2. Under the Promoters/Partners tab, you can enter the details of up to 10 promoters or partners.
Personal details such as name, address, mobile number, date of birth, email address, and gender and identity details such as designation/position and director identification number If the taxpayer is a company, whether Indian citizen or not, PAN and Aadhaar number must all be entered Go.
Therefore, Fill in the residential address and upload a photograph of the stakeholder. You are allowed to upload PDF or JPEG files with a maximum file size of 1MB for upload.
However, If the Promoter is also the Primary Authorized Signatory, make the necessary selections. Click on the ‘Save and Continue button to proceed.
3. After that, Enter the details of the Authorized Signatory as entered for the Promoters/Partners in Step 10.
4. After that, Enter Principal Place of Business details.
5. Submit the details of the goods and services in the next tab with the HSN code or SAC for up to 5 goods and 5 services at the top of your list.
6. After Next, enter the taxpayer’s bank details for a maximum of 10 bank accounts. Submission of bank account details has been made optional with effect from 27th December 2018. If you do not report these details at the time of GST registration, after providing the GSTIN, you will get a prompt on the first login to the GST portal for filing a non-major amendment application for submitting bank details.
Also, upload supporting documents together with the details.
7. However, Under the State Specific Information tab, enter the License holder’s name along with the Professional Tax Employee Code Number, PT Registration Certificate Number, and State Excise License Number. Click on ‘Save and Continue’.
8. After that, choose whether you are willing to do Aadhaar authentication or not. Know more about the process and options available from our page, “Everything you need to know about Aadhaar authentication and steps”.
Note that if the authorized signatory has chosen to go for Aadhaar authentication, there will be no need for physical verification of the premises or site by the officer, except in exceptional cases. In such cases, ARN will be generated immediately after its completion.
9. After that, Once all the details are filled go to the verification page. Tick the declaration and submit the application using any of the following methods:
- Companies and LLPs must submit application using DSC
- Using e-Sign – OTP will be sent to Aadhaar registered number
- Using EVC – OTP will be sent to the registered mobile
10. On a successful application a message is displayed and Application Reference Number (ARN) is sent to the registered email and mobile.
However, You can check the ARN status for your registration by entering the ARN in the GST Portal.
Who should register for GST?
Therefore, While it is mandatory to register for GST for those traders whose turnover is more than ₹ 40 lakhs, the registration should also be done by the following entities:
- Any person who has registered under the pre-GST law of exercise, VAT, or service tax.
- Persons who are paying tax under reverse charge mechanism. Reverse charge is a mechanism where the recipients of goods/services have to pay GST.
- If any person is supplying information online to a person who is a non-taxable person in India.
- Agents of supplier and input supply distributor.
- Persons who are supplying inputs through e-commerce aggregators.
Documents Required for GST Registration
- PAN Card of the company/ business entity
- Proof of constitution like Articles of association, Memorandum of Association, Certificate of Incorporation, Partnership Deed, etc
- Proof of place of business like Electricity bill
- Canceled cheque of your bank account showing all the details of the account holder
READ ALSO : GST Return: How to File GST Return Online
READ ALSO : GST Invoice Format Details and Essential Information